7 Day Diet Plan For Fat Burning

7 Day Diet Plan For Fat Burning

Photo Courtesy: alvarez/E+/Getty Images

In the United States, the average person consumes only about 10-15 grams of fiber per day. And that's not even half of the official recommendation. Along with protein, carbohydrates, and essential fats, fiber is an integral part of a healthy diet. So, what makes it essential?

Unlike other food components, fiber is indigestible. Although it is not absorbed by the body, fiber provides many health benefits, from maintaining bowel health to controlling blood sugar levels. With this in mind, developing a high-fiber diet plan is a great idea for folks with particular health needs. Here, we'll review which foods to eat and how to incorporate the right amount of fiber into your diet while avoiding the common pitfalls associated with high-fiber regimens.

As you may know, there are two types of dietary fiber — insoluble and soluble. The difference is simple: soluble fiber partially dissolves in water, while insoluble doesn't. While neither type of fiber is digestible, soluble fiber does undergo some changes as it travels through one's digestive tract.

Photo Courtesy: fcafotodigital/E+/Getty Images

To make the most of a high-fiber diet, one should incorporate both types of fiber into their plan, namely because they provide different health benefits. For instance, diverticulitis is a common disease that causes the colon to develop small pouches, which become painful and inflamed. According to the Harvard School of Public Health, eating a diet high in insoluble fiber is believed to lower the risk of diverticulitis by about 40 percent.

Benefits of a High Fiber Diet

Most people have heard that fiber should be incorporated into their diet, but its benefits may still surprise many folks. For example, eating foods high in soluble fiber can help lower cholesterol levels and, as a result, the risk of experiencing heart disease.

Moreover, a diet high in both insoluble and soluble fiber is vital for people who have, or are at high risk of developing, diabetes. According to the Mayo Clinic, increasing soluble fiber in one's diet can help control blood sugar levels by slowing down the absorption of sugar. The chances of developing type 2 diabetes also decrease in people who eat a diet high in insoluble fiber.

Although most people will experience an occasional bout of constipation, elderly folks may encounter it more frequently, so a high-fiber diet may be beneficial as it can decrease the chances of constipation. Another benefit? A high-fiber diet may help with weight loss since eating fiber-rich foods can help dieters feel full faster and, therefore, eat less.

Tips for Crafting a Successful High-Fiber Diet

When creating a high fiber diet plan, several tips can help make the change easier and reduce the likelihood of common pitfalls. First, it is crucial to know how much dietary fiber to consume. According to the University of Maryland Medical Center, most adults should eat a minimum of 25 to 40 grams of fiber each day.

Selecting Good Sources of Fiber

First up: insoluble fiber. Great sources of insoluble fiber include various fruits, like apples and raspberries, as well as vegetables, like broccoli and carrots. When choosing your daily fruit and vegetables, keep in mind that the highest fiber content will be located in the skin and pulp of vegetables. Root vegetables and leafy greens — carrots, potatoes, kale and spinach — are all solid high-fiber choices.

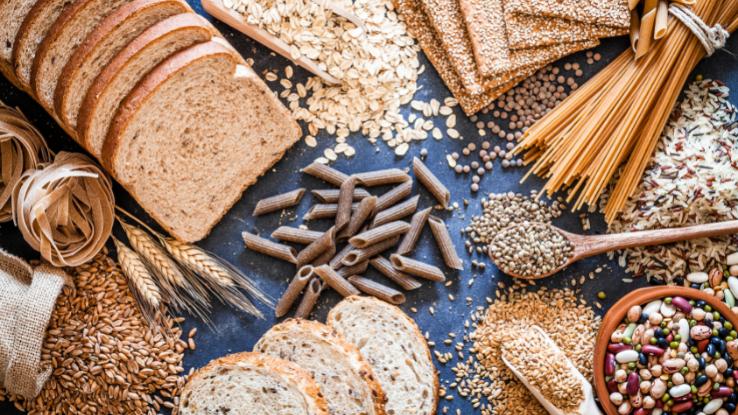
So, what about soluble fiber? Foods made from whole grains, such as bread, pasta, and oats, are good choices when it comes to crafting a daily high-fiber diet plan, namely because wheat bran, which is part of the grain, has a very high fiber content. Other foods high in soluble fiber include barley and legumes, such as peas, lentils, and beans.

Another way to add more fiber to one's diet? Trade your morning glass of fruit juice for a piece of whole fruit — skin and all. You'll not only get more fiber, but you'll likely consume less calories.

Common Pitfalls Associated With High-Fiber Diets

Even when eating healthy, too much of a good thing can have negative consequences. Since fiber is not digested, overeating it — or eating too much of it quickly — can lead to bloating and gas. Some people may also develop diarrhea if they overeat fiber. To mitigate this side effect, fiber intake should be increased gradually over the course of six weeks. This will allow one's body time to adjust.

Another reason to increase your fiber intake slowly? A sudden increase in fiber may lead to stomach cramps and other intestinal discomforts. When making the gradual transition to a high-fiber diet, remember that even small dietary changes can add up. For instance, swap processed white bread for whole-grain loaves of bread made from oat or wheat bran.

Although it may decrease constipation in some people, increased fiber can also have the opposite effect and lead to constipation or irregular bowel movements. Therefore, it's important to drink plenty of water when one increases their fiber intake.

Resource Links:

  • "High Fiber Diet" via National Center for Biotechnology Information (NCBI), U.S. National Library of Medicine
  • "Diet and Health: Implications for Reducing Chronic Disease Risk" via Diet and Health, National Center for Biotechnology Information (NCBI), U.S. National Library of Medicine
  • "Health benefits and practical aspects of high-fiber diets" via The American Journal of Clinical Nutrition
  • "The Health Benefits of Dietary Fiber" via Nutrients, National Center for Biotechnology Information (NCBI), U.S. National Library of Medicine
  • "Dietary fibre in foods: a review" via J. Food Science Tech., National Center for Biotechnology Information (NCBI), U.S. National Library of Medicine

MORE FROM SYMPTOMFIND.COM

7 Day Diet Plan For Fat Burning

Source: https://www.symptomfind.com/health/high-fiber-diet-plan-tips?utm_content=params%3Ao%3D740013%26ad%3DdirN%26qo%3DserpIndex

Share:

Safavieh Dining Set

Safavieh Dining Set

two dining sets for small spaces

Urban Outfitters/AllModern

You may live in a small space that lacks a dining room, but that doesn't mean you can't carve out a space for mealtimes and entertaining guests. There are plenty of smaller dining table sets out there that can fit in even the tiniest of spaces—especially if you go for a counter height set with stools that can tuck underneath your table. Whether you're looking to seat two people, four people, or even just one person, these bistro sets have you covered. As a bonus, several of these options are under $200, and all are under $400—meaning they take up as little space in your wallet as they do in your home.

1 Haskall Breakfast Bar

Not only does this breakfast bar set seat two people with plenty of space to eat, the stools hang neatly from built-in racks under the table, so you can stash them away when not in use (or for easy sweeping and vacuuming).

2 3-Piece Drop Leaf Dining Set

CosmoLiving
allmodern.com
$334.99

BUY NOW

This gold-and-white table and chairs set is simple and sleek, and since this table has a drop-leaf section, it can take up as much (or as little) space as you'd like.

3 5-Piece Dining Room Bar Table Set

If you have a little more room to play with and want to seat more than two people, this 5-piece pub set comes with four stools, all of which tuck neatly under the table.

4 NORDEN / RÃ…SKOG Table and 2 Stools

This set from Ikea features a solid pine drop-leaf table (with storage drawers!) and two metal stools. Fold both leaves down to save even more space, fold one out to seat two people, or fold both out to seat four or more.

5 Ethel Rectangular 3-Piece Bar Set

For a particularly narrow space, this 3-piece pub set is the perfect choice—the table is only 17 inches deep, after all, and you can tuck the stools in to save even more space.

6 3-Piece Bar Table Set

walmart.com
$109.99

BUY NOW

A tall, narrow round table is a smart choice for any small space, and pairs perfectly with two stools. Even if all you have to spare is a little nook, this set can fit right in.

7 Millie Walnut 5-Piece Dining Set

pier1.com
$297.49

BUY NOW

Another option for people with a little more room to seat guests, this round table comes with four stools, but at only 31.5 inches in diameter, this table takes up a lot less space than a typical dining room set.

8 Counter Height Dining Table Set with Storage

If you need a narrow dining set solutionand some added storage, this 19.5-inch-wide table seats two and features three deep shelves and hooks for all your kitchen accessories.

9 Walnut Counter Height Dining Set

pier1.com
$356.99

BUY NOW

With two chairs and a table that's only 35 inches wide, this simple wood bistro set is perfect for carving out a small but cozy dining room area, even in a studio apartment.

10 BJURSTA / NILS Table and Stool

If you only need a dining solution for one, this drop-down, wall-mounted table pairs perfectly with one stool for a meal space that only takes up room when you need it to—plus, you can always get an extra stool to serve a second person.

Market Editor, House Beautiful Brittney Morgan is a noted land mermaid and a Virgo with a penchant for crafts, red lipstick, and buying way too many throw pillows.

This content is created and maintained by a third party, and imported onto this page to help users provide their email addresses. You may be able to find more information about this and similar content at piano.io

Safavieh Dining Set

Source: https://www.housebeautiful.com/room-decorating/dining-rooms/g28354929/dining-sets-for-small-spaces/

Share:

Glass Extension Dining Table

Glass Extension Dining Table

Table, Furniture, Coffee table, Wood, Desk, Room,

Getty; Courtesy Getty Images

1 A 19th-Century English Extending Oak Dining Table

Buy Now $31,380.84

Made circa 1820, this "very unusual antique dining table" is made of oak covered with medullary rays. It's unique since mahogany was in fashion during the Regency period, and "the use of oak for construction of high fashion furniture was not common at the time." It also splits into two separate console tables.

2 A 1970s Burr and Chrome Paul Evans Cityscape Extendable Dining Table

Buy Now $31,380.84

Designed by Paul Evans, this burr and chrome table can seat up to 14 people and was part of the designer's Cityscape Collection, a series that ran from 1971 to 1981.

3 A Late 18th-Century Directoire Extendable Mahogany, Brass, and Gilt Bronze Table

Buy Now $31,378.43

This mahogany table from the Directory period can seat between 8 and 18 and can be extended up to 230 inches.

4 "Half Moon," a Marble and Brass or Gold-Plated Dining Table Designed by Lara Bohinc

Buy Now $30,616

Slovenian-born designer Lara Bohinc offers "Half Moon," a dining table featuring marbles including black and gold, Verde Guatemala, Picasso, Calacatta, Red Wine, and Monclair, all framed by solid brushed brass or 22-carat gold-plated steel rims. It requires more than 100 hours of work and production takes 15 to 16 weeks.

5 A Walnut Concave Dining Table

Buy Now $30,366.22

Dunleavy Bespoke designed this option in American black walnut, which is hand-sculpted into an elliptical concave form. Production takes 10 to 11 weeks.

Contributing Digital Editor Sam Dangremond is a Contributing Digital Editor at Town & Country, where he covers men's style, cocktails, travel, and the social scene.

This content is created and maintained by a third party, and imported onto this page to help users provide their email addresses. You may be able to find more information about this and similar content at piano.io

Glass Extension Dining Table

Source: https://www.townandcountrymag.com/style/home-decor/g19432112/expensive-dining-tables/

Share:

Christmas Dining Room Centerpieces

Christmas Dining Room Centerpieces

Ready to decorate your home for the holidays? Add something cool and Christmasy to your table with these creative DIY centerpieces. From rustic pinecone crafts to holiday mason jars and bright ornament displays, you are sure to find something that you love here. With all the fun candy ideas, the kids are sure to drool over them! My personal favorite is the vintage washtub filled with fragrant pine tree branches and the touch of rustic charm with the handmade Christmas trees.

All of these come with easy step by step tutorials, so check out these awesome ideas and make one or more of these this weekend to get your home ready for Christmas! Your table needs these…we promise!

DIY Christmas Centerpieces

1. Pinecones And Berries Christmas Centerpiece

julieblanner

DIY Christmas Centerpieces - Pinecones And Berries Christmas Centerpiece - Simple, Easy Holiday Decorating Ideas on A Budget - cheap dollar store crafts holiday

Whether you are looking for DIY Christmas table decor or some crafty do it yourself ideas for your mantle during the holidays, this pinecone and berry is a DIY Christmas centerpiece you want to make for your display.

2. Christmas Centerpiece Under $5

cleverlysimple

DIY Christmas Centerpieces - Christmas Centerpiece Under $5 - Simple, Easy Holiday Decorating Ideas on A Budget- cheap dollar store crafts holiday #holiday #crafts #christmas

When it comes to cheap DIY Christmas centerpiece ideas, this cute display made with dollar store vases and inexpensive Christmas ornaments is one of the prettiest I've seen. Decorate for the holidays while saving money to spend on gifts. This Christmas craft project costs less than $5 to make, so we think you should make several. For an awesome way to decorate the mantle during the holidays or add a festive flair to the Christmas dining table, make this center piece decoration.

3. DIY Tree Centerpiece With Bunting

baysidebride

DIY Christmas Centerpieces - DIY Tree Centerpiece With Bunting - Simple, Easy Holiday Decorating Ideas on A Budget- cheap dollar store crafts holiday #holiday #crafts #christmas

These rosemary trees that double as tiny Christmas trees look so adorable on the table during the holidays. I've started buying one every year now, and it always end up being my favorite Christmas decorating idea. Each year, I do something a little different with my rosemary tree. Last year, I hung tiny colorful round ornaments, some cute pom poms my daughter made and a little string of clear mini LED Christmas lights. This year, I am making this cute bunting for a DIY Christmas tree idea that is super unique and sure to look great with my new farmhouse decor.

4. Kiss-Mas Tree Centerpiece

kitchenmeetsgirl

DIY Christmas Centerpieces - Kiss-Mas Tree Centerpiece - Simple, Easy Holiday Decorating Ideas on A Budget- cheap dollar store crafts holiday #holiday #crafts #christmas

The ladies at my lodge love Hershey's Kisses, so when tasked with making DIY centerpieces for our anual Christmas brunch, this was a cheap and easy choice for me. All you need for this quick and easy project are some cone-shaped pieces of foam – I got mine at Michael's in the 6in and 9 in sizes. I used approximately three bags of Hershey's Kisses Chocolates for the 9-inch tree and two bags for the 6-inch tree. I snapped toothpicks in half and inserted each half into the bottom of a Kiss. These were a little difficult to press in, so I had my husband poke tiny holes with a super small screwdriver (cleaned first, of course) to get things started. Once the picks were inserted into the candies, I let Doodle go to town sticking them into the foam. We used a decorative cupcake pic we found at my local cake supply store for the tree topper, but I think you could easily find something similar at your favorite craft store (Michael's, Hobby Lobby, etc.).

5. Simple Cranberry Centerpieces

rosyscription

DIY Christmas Centerpieces - Simple Cranberry Centerpieces - Simple, Easy Holiday Decorating Ideas on A Budget- cheap dollar store crafts holiday #holiday #crafts #christmas

I love cranberries. I love to eat them in my yogurt or cereal. I love that they can be both sweet and tart. But most of all, I love their deep red color and sheen, especially this time of year.
I am fond of cranberries so much that I even used them as a DIY centerpiece for my fall wedding years ago. (It was a really simple large hurricane vase, a pillar candle with cranberries around it.)
Cranberries are an inexpensive, fast and pretty way to have a 'fresh' centerpiece around Thanksgiving and Christmas. (versus a fresh flower arrangement) These arrangements were very simple to create. I grabbed some clear containers from the party supply store (you could use glass vases you had at home, too). Then, I poured Epsom salts into the bottoms of each vase. I added a thick layer of berries on top of the salt. Then, I ran outside with a pair of scissors and trimmed some of our evergreen shrubs. I stuck the greens in the cranberries and that was it! Gorgeous, cheap easy and everyone loved them!

6. Shabby Christmas Centerpiece

confessionsofaplateaddict

DIY Christmas Centerpieces - Shabby Christmas Centerpiece - Simple, Easy Holiday Decorating Ideas on A Budget- cheap dollar store crafts holiday #holiday #crafts #christmas

If you need a quick DIY rustic, country centerpiece idea this one is for you! This is a super easy project, one that looks fabulous and festive and is cheap, easy and quick to assemble. It's a Christmas centerpiece made from lots of fresh greenery from the yard with a few silvery berries for sparkle. It fills a fabulously Frenchy galvanized container…a wonderful gift from a sweet friend…with a trio of shabby folded trees to finish it off!

7. Easy Hershey's Kisses Holiday Centerpiece

smartschoolhouse

DIY Christmas Centerpieces - Easy Hershey's Kisses Holiday Centerpiece - Simple, Easy Holiday Decorating Ideas on A Budget- cheap dollar store crafts holiday #holiday #crafts #christmas

If you are ever feeling stuck and do not have the time to make an elaborate centerpiece arrangement this DIY Hersey's Kisses centerpiece is for you! Decorating for the holidays is something we love to do and could not get cheaper or easier! Today I started decorating with my kids, which means the details needed to be easy to work with and fun. What we came up with is a beautiful Hershey's Kisses Centerpiece! This centerpiece is not only gorgeous and inviting, but it also captures attention and starts conversation. Best of all, it's edible! We got the holiday sticks and the candy at Michael's and just used a vase we already had, it looked so fabulous.

8. Silver And Blue Christmas Centerpiece

twotwentyone

DIY Christmas Centerpieces - Silver And Blue Christmas Centerpiece - Simple, Easy Holiday Decorating Ideas on A Budget- cheap dollar store crafts holiday #holiday #crafts #christmas

I have a really big dining table and needed a quick and easy DIY centerpiece idea for a spur of the moment Christmas gathering. This idea jumped off my Pinterest page because I had all these items around the house, so that meant no cash outlay and no travel time for me. The DIY centerpiece was super easy, I used the silver Home Goods serving tray as the base. The silver deer ornaments were purchased on sale at Kohls last year. I scored the pretty vintage blue ornaments and silver tinsel at Salvation Army a few months ago, the little silver ornaments are from Hobby Lobby, and the clear containers are from Home Goods. I must say that I love taking a clear container, throwing in some tinsel, and topping it off with ornaments. It's easy. It's inexpensive. It's pretty. I love my spray painted manzanita branch. You can't go wrong with a manzanita branch in your decor arsenal. This DIY centerpiece looks amazing and will impress the fussiest of guests.

9. Fun And Festive Christmas Centerpiece

southernhospitalityblog

DIY Christmas Centerpieces - Fun And Festive Christmas Centerpiece - Simple, Easy Holiday Decorating Ideas on A Budget- cheap dollar store crafts holiday #holiday #crafts #christmas

I saw this DIY centerpiece idea on Pinterest that was put together using items from Lowes, I knew it would be perfect for my Christmas luncheon for my coworkers. It wasn't too fancy and it was really affordable. So I started with a piece of burlap to use as the base and then pulled out a really pretty green and red Christmas runner. At Lowes, I found a Christmas shaped evergreen shrub, along with a silver bucket to put it in. I also found some cactus that screamed Christmas to me (hello red ball on the top!) to use as a treat at each table setting and wanted to put them in something, so these plumbing couplings were perfect for that. A can of Valspar paint in glossy red did the trick for my purposes, the red was full of Christmas cheer. This DIY centerpiece looked fantastic at my luncheon.

10. Easy DIY Christmas Card Centerpiece

funwiththefullwoods

DIY Christmas Centerpieces - Easy DIY Christmas Card Centerpiece - Simple, Easy Holiday Decorating Ideas on A Budget- cheap dollar store crafts holiday #holiday #crafts #christmas

This is one of the cutest, cheapest and easiest DIY centerpieces I've ever made. This DIY centerpiece is very simple to create and has a subtle yet special effect anywhere you place it. You just take a glass vase, I had a hurricane lamp vase I bought at Michaels last year and filled it with pinecones and Christmas ornaments. We had all of this on hand; use what you've got! Candy canes or Christmas lights would be cute, too. So cute and easy for a spur of the moment holiday event.

11. Stunning Holiday Centerpiece

diyjoy

DIY Christmas Centerpieces - She Makes A Stunning Holiday Centerpiece And She Bought The Supplies At The Dollar Store! - Simple, Easy Holiday Decorating Ideas on A Budget- cheap dollar store crafts holiday #holiday #crafts #christmas

I needed a DIY centerpiece that was elegant enough for a formal dinner table setting, but it needed to adhere to my regular DIY criteria which is cheap, easy and convenient and this arrangement fit the bill to absolute perfection. I used tall champagne flutes to hold some old DIY gold and silver glitter ornaments I had from years ago and placed a magnolia arrangement inside the one in the middle, so it kind of spilled out like a fountain. The whole thing took me less than 30 minutes and looked fantastic.

12. Sticks And Pom Poms Centerpiece

northpole

DIY Christmas Centerpieces - Sticks And Pom Poms Centerpiece - Simple, Easy Holiday Decorating Ideas on A Budget- cheap dollar store crafts holiday #holiday #crafts #christmas

What a fabulous DIY centerpiece this is! You just mix and match several of the craft projects you have made to create something new. When you combine some festive yarn pom poms and a vase wrapped with twine, you have a quick and easy centerpiece! I placed some pompoms around the vase and it really brought things together. This is a super little DIY Christmas idea.

13. Christmas Boot Centerpiece

mellywoodsmansion

DIY Christmas Centerpieces - Christmas Boot Centerpiece - Simple, Easy Holiday Decorating Ideas on A Budget- cheap dollar store crafts holiday #holiday #crafts #christmas

My kids were having a class party and I needed to bring a DIY centerpiece. I had run low on ideas and I remembered my daughter had lost one of her rubber rain boots on the school bus the other day. So I covered her existing boot in red glitter and attached some fake fur to the top and filled with candy canes. No one could believe how cute it was, all the kids started mysteriously losing one boot so they could make one too! 😉

14. Little Church In The Woods Christmas Centerpiece

everydayhomeblog

DIY Christmas Centerpieces - Little Church In The Woods Christmas Centerpiece - Simple, Easy Holiday Decorating Ideas on A Budget- cheap dollar store crafts holiday #holiday #crafts #christmas

15. DIY Christmas Ornament Centerpiece

shanty-2-chic

DIY Christmas Centerpieces - DIY Christmas Ornament Centerpiece - Simple, Easy Holiday Decorating Ideas on A Budget- cheap dollar store crafts holiday #holiday #crafts #christmas

16. Christmas Table Centerpiece

theidearoom

DIY Christmas Centerpieces - Christmas Table Centerpiece - Simple, Easy Holiday Decorating Ideas on A Budget- cheap dollar store crafts holiday #holiday #crafts #christmas

17. Layered Holiday Centerpiece

hgtv

DIY Christmas Centerpieces - Layered Holiday Centerpiece - Simple, Easy Holiday Decorating Ideas on A Budget- cheap dollar store crafts holiday #holiday #crafts #christmas

18. DIY Rustic Wooden Box Centerpiece With Gold Pinecones

boxycolonial

DIY Christmas Centerpieces - DIY Rustic Wooden Box Centerpiece With Gold Pinecones - Simple, Easy Holiday Decorating Ideas on A Budget- cheap dollar store crafts holiday #holiday #crafts #christmas

19. Christmas Galvanized Tray Centerpiece

priscillas2000

DIY Christmas Centerpieces - Christmas Galvanized Tray Centerpiece - Simple, Easy Holiday Decorating Ideas on A Budget- cheap dollar store crafts holiday #holiday #crafts #christmas

20. Easy DIY Topiary Trees

rosyscription

DIY Christmas Centerpieces - Easy DIY Topiary Trees - Simple, Easy Holiday Decorating Ideas on A Budget- cheap dollar store crafts holiday #holiday #crafts #christmas

21. Simple And Pretty Christmas Centerpiece

aprettylifeinthesuburbs

DIY Christmas Centerpieces - Simple And Pretty Christmas Centerpiece - Simple, Easy Holiday Decorating Ideas on A Budget- cheap dollar store crafts holiday #holiday #crafts #christmas

22. DIY Glass Vase Reindeer Centerpiece

everydaydishes

DIY Christmas Centerpieces - DIY Glass Vase Reindeer Centerpiece - Simple, Easy Holiday Decorating Ideas on A Budget- cheap dollar store crafts holiday #holiday #crafts #christmas

23. Cake Stand Christmas Centerpiece

stonegableblog

DIY Christmas Centerpieces - Cake Stand Christmas Centerpiece - Simple, Easy Holiday Decorating Ideas on A Budget- cheap dollar store crafts holiday #holiday #crafts #christmas

24. Easy Jar Holiday Centerpiece

taketimeforstyle

DIY Christmas Centerpieces - Easy Jar Holiday Centerpiece - Simple, Easy Holiday Decorating Ideas on A Budget- cheap dollar store crafts holiday #holiday #crafts #christmas

25. Christmas Log Centerpiece

jennaburger

DIY Christmas Centerpieces -Christmas Log Centerpiece - Simple, Easy Holiday Decorating Ideas on A Budget- cheap dollar store crafts holiday #holiday #crafts #christmas

26. Christmas Ornaments Centerpiece

vanessachristenson

27. Fresh Fruit Table Centerpiece

yourcozyhome

DIY Christmas Centerpieces - Fresh Fruit Table Centerpiece - Simple, Easy Holiday Decorating Ideas on A Budget- cheap dollar store crafts holiday #holiday #crafts #christmas

28. Easy Holiday Centerpiece

33shadesofgreen

DIY Christmas Centerpieces - Easy Holiday Centerpiece - Simple, Easy Holiday Decorating Ideas on A Budget- cheap dollar store crafts holiday #holiday #crafts #christmas

29. Christmas Tablescape

sweetsomethingdesign

DIY Christmas Centerpieces - Christmas Tablescape - Simple, Easy Holiday Decorating Ideas on A Budget- cheap dollar store crafts holiday #holiday #crafts #christmas

30. Mason Jar And Pinecones Centerpiece

yellowblissroad

DIY Christmas Centerpieces - Mason Jar And Pinecones Centerpiece - Simple, Easy Holiday Decorating Ideas on A Budget- cheap dollar store crafts holiday #holiday #crafts #christmas

31. Deck Your Halls Easy Christmas Centerpiece

cheapcraftymama

DIY Christmas Centerpieces - Deck Your Halls Easy Christmas Centerpiece - Simple, Easy Holiday Decorating Ideas on A Budget- cheap dollar store crafts holiday #holiday #crafts #christmas

32. Dollar Store Christmas Centerpiece

peppermintplum

DIY Christmas Centerpieces - Dollar Store Christmas Centerpiece - Simple, Easy Holiday Decorating Ideas on A Budget- cheap dollar store crafts holiday #holiday #crafts #christmas

33. DIY $1 Coffee Filter Trees Centerpiece

iheartnaptime

DIY Christmas Centerpieces - DIY $1 Coffee Filter Trees Centerpiece - Simple, Easy Holiday Decorating Ideas on A Budget- cheap dollar store crafts holiday #holiday #crafts #christmas

34. $5 Holiday Centerpiece

oceanfrontshack

DIY Christmas Centerpieces - $5 Holiday Centerpiece - Simple, Easy Holiday Decorating Ideas on A Budget- cheap dollar store crafts holiday #holiday #crafts #christmas

Christmas Dining Room Centerpieces

Source: https://diyjoy.com/diy-christmas-centerpieces/

Share:

Blue And Yellow Dining Room Ideas

Blue And Yellow Dining Room Ideas

Surrey Mansion

Stephenson Wright Ltd

Photo of a classic enclosed dining room in Surrey with blue walls, medium hardwood flooring, a standard fireplace, a stone fireplace surround, wainscoting and a chimney breast.

Dining Room

FIONA DUKE INTERIORS

Photo of a traditional dining room in Hertfordshire with blue walls, light hardwood flooring, a standard fireplace and a chimney breast.

A Bolt from the Blue

colour + shape

Matthew Smith
Design ideas for a medium sized contemporary kitchen/dining room in Cambridgeshire with white walls, porcelain flooring, no fireplace and beige floors.

Holland Park Villa

Turner Pocock

Inspiration for a traditional dining room in London.

Dining Room

Nate Fischer Interiors

Nate Fischer Interior Design
Inspiration for a large contemporary enclosed dining room in Orange County with black walls, dark hardwood flooring, brown floors and a feature wall.

Colorful Dining Room

Ann Lowengart Interiors

To eliminate an inconsistent layout, we removed the wall dividing the dining room from the living room and added a polished brass and ebonized wood handrail to create a sweeping view into the living room. To highlight the family's passion for reading, we created a beautiful library with custom shelves flanking a niche wallpapered with Flavor Paper's bold Glow print with color-coded book spines to add pops of color. Tom Dixon pendant lights, acrylic chairs, and a geometric hide rug complete the look.

McLean Modern Farmhouse

DeFalco Home Design

Photography: BTW Images
This is an example of a rural enclosed dining room in DC Metro with grey walls, light hardwood flooring, no fireplace, beige floors and a feature wall.

Interiors

Laura Dante Photography

Laura Dante
Inspiration for a contemporary dining room in Tampa with blue walls and medium hardwood flooring.

English Manor

Sims Luxury Builders

This is an example of a classic dining room in Houston with blue walls, light hardwood flooring, a standard fireplace and a chimney breast.

Cantilever House

Birdseye Design

This is an example of a large contemporary open plan dining room in Burlington with white walls and concrete flooring.

Mid-century Re-modern

SHKS Architects

The kitchen was redesigned to accommodate more cooks in the kitchen by improving movement in and through the kitchen. A new glass door connects to an outdoor eating area. Photo credit: Dale Lang

Nevis Trail - Charleston, SC

Nevis Trail - Charleston, SC

Krystine Edwards Design

A sweet newly married couple just moved into their Charleston home with standard builder features in their dining room, like beige walls and oil rubbed light fixtures. With a little paint - Benjamin Moore's Hale Navy - and some pretty gold home accessories, this formal dining room was well on its way to fabulous! We included Ballard Design gold pendants, Serena & Lily zig cotton dhurrie rug, Restoration Hardware pedestal dining table and chairs, Home Goods lamps and vases and coastal artwork framed in gold.

Blue And Yellow Dining Room Ideas

Source: https://www.houzz.co.uk/photos/blue-dining-room-ideas-and-designs-phbr1-bp~t_10281~a_88-6

Share:

How Do I Refinish My Dining Room Table

How Do I Refinish My Dining Room Table

Today I'm sharing everything you need to know to refinish your old, run down wood table and make it beautiful again.  Learn how to refinish a table including how to strip away the old finish, paint the legs, restain the top, and protect the finish so that it will last for years to come.

If you saw my table from a distance, you'd think I was crazy for calling it worn out. It is an absolutely beautiful table with gorgeous wood grain and beautiful details.  Up close things aren't quite as pretty though.

wood table top with beautiful wood grain

dining table that needs to be refinished

The top was absolutely covered with scratches and huge scuffs where the finish was completely gone. And the legs and apron were also covered in nicks and dings.

This was definitely not how this beautiful table was meant to look.

apron of wood table needing to be refinished

I found this table a little over a year ago on Facebook Marketplace and it was an absolute steal. I scored the table with two leaves and six matching chairs for only $50!

I was six months pregnant at the time so I knew it wouldn't be refinishing the set anytime soon. So we set them up in our dining room, scuffs and all and called it good.

Well, here we are more than a year later and I decided it was finally time to refinish the table.

(The matching chairs need a bit more repair so they are hanging out in our basement for now until I get around to dealing with them. Luckily my blue chairs also look great with the table.)

refinished wood dining table

Nobody would call this table run down now! Just look at that gorgeous wood grain.

I love painting furniture, but there is just something about restoring a beautiful piece of wood furniture that is almost magical.

This post contains affiliate links which means if you make a purchase after clicking a link I will earn a small commission but it won't cost you a penny more.  Click here to see my full disclosure policy

Materials Used to Refinish Table

For stripping the old finish

  • KleanStrip Stripper
  • KleanStrip Paint Stripper After Wash
  • chip brush
  • metal container – an old metal bowl or pan works well for this
  • stripping brush
  • plastic paint scraper
  • stripping pads
  • clean rags
  • gloves
  • sanding block and extra sandpaper, 220 and 400 grit

For painting the legs

  • Zinsser Bullseye Clear Shellac
  • General Finishes Snow White Milk Paint (one of my favorite furniture paints)
  • paintbrush – these are some of my favorites for painting furniture
  • HomeRight Finish Max Sprayer – you definitely do NOT have to have a paint sprayer to paint furniture, but it does make the job go much faster!
  • Large Homeright spray shelter – this is completely optional, but if you are painting furniture with a paint sprayer, this spray shelter is a great way to protect the area where you are working from overspray.

For staining the table top

  • Minwax prestain wood conditioner
  • Minwax Provincial stain
  • clean rags
  • Minwax Fast Drying Polyurethane, Satin
  • foam brush
  • 400 grit sandpaper

How to Refinish a Table

Stripping the Old Finish

The first step is stripping away the old finish from the table top. This is probably the most intimidating part of the whole process, but it truly isn't difficult, just messy and a bit tedious.

There are two main methods of removing paint or stain from wood furniture: sanding and using a chemical stripper.

I've used both methods, but in most cases I prefer using a stripper. Sanding can be time-intensive and it is very easy to unintentionally sand marks into the wood or sand right through wood veneer.

Using a stripper requires more steps (including a bit of sanding at the end), but it leaves a perfectly smooth wood surface in the end. I used KleanStrip Stripper .

There are other strippers available that use slightly less harsh chemicals and are more environmentally friendly but they tend to take much longer to work.

I chose to use KleanStrip because it works really well and really fast. Since it is full of pretty strong chemicals, it is important to take all appropriate safety precautions.  It is best to work outside and be sure that you wear gloves to protect your skin.

Pour some stripper into a metal container and use a cheap chip brush to brush a layer of stripper onto your table top.  My table is pretty large, so I worked in smaller sections.

This stuff works very quickly; I was able to see the finish immediately begin to separate from the wood.

Wait around ten minutes and then you can test a small area to see if it is ready to scrape.

using furniture stripper to strip the old stain

Use a plastic paint scraper to scrape away the old finish. This part is very messy. It helps to have paper towels nearby just in case and also to have an old box to scrape the mess into.

If the finish feels sticky or resists as you scrape, it isn't ready yet. You should be able to scrape it away without much effort.

stripping a table with a wire brush

Use a wire brush to scrape away the finish from the table edge.

Once you have scraped away the finish, the table will probably still look pretty messy. If there is a lot of thick varnish left, you may need to repeat the stripping process.

Otherwise, you can skip straight to applying the KleanStrip Paint Stripper After Wash . This really helps clear away the rest of the finish and most of the stain as well.  Use a stripping pad to apply After Wash to a small section, scrubbing it into the wood in small circles.

Then use a second stripping pad dampened with water, to help rinse away the remaining residue. Finally use a rag to wipe away any remaining water and gunk.

refinish a table with furniture stripping after wash

Look what a huge difference the After Wash makes. The section to the left hasn't received any After Wash yet, while the section to the right has.

Once the table has fully dried, you can use sandpaper to remove those last stubborn bits of stain and ensure the finish is nice and even. You want to use extra fine sandpaper and be sure to sand in the same direction as the wood grain.

And yes, it is best to sand by hand at this point, rather than with a power sander.

I started by sanding my tabletop with a 220 grit sanding block, followed by 400 grit. This really helped remove the last little traces of stain and leave a perfectly smooth, even surface ready for new stain.

After sanding remove all of the sawdust from the tabletop using a soft cloth.

Painting the Table Legs

I chose to paint the legs of the table rather than restaining them for a couple of reasons. I did not want to take on the task of stripping the stain from all of the nooks and crannies on this table and luckily, I really love the look of a table with white legs and a wood top.

Even though painting is simpler than restaining, there are still some important steps to follow. The first step to painting a piece of furniture is always cleaning. It's important to clean away greasy residue, crumbs, and dust to leave a clean surface that paint will stick to.

After cleaning, I used painter's tape and some extra thick wrapping paper to cover the freshly stripped tabletop to protect it during painting.

painting a table with a paint sprayer in a paint shelter

When painting furniture white, I always start with a good sealer or primer to prevent wood tannins from bleeding through the paint and yellowing the finish.

In this case, I used spray on Zinsser Bullseye Clear Shellac . Since it comes in spray paint form, it was really fast to apply to the turns and details of my table apron and legs.

I applied two coats of sealer and once it was dry used General Finishes Milk Paint in Snow White .

I applied two coats of paint using my HomeRight Super Finish Max Paint Sprayer.

Of course, you can also use a paintbrush to apply your paint; it will just take more time. I did use a paintbrush to help fill in some spots that the sprayer didn't do a great job of hitting.

dining table with white painted legs inside spray shelter

Want more details?

I have an entire post dedicated to painting furniture white including what products to use and how to make sure you prevent bleed-through.

close up of details of white table legs and apron

Staining the Tabletop

Once I saw how beautiful my naked tabletop was, I strongly considered skipping the stain and leaving the wood its natural color. But I decided to go classic with a medium stain instead.

I chose Minwax Provincial Stain . It has a beautiful color that isn't too yellow and is light enough it won't hide the beautiful wood grain.

Before staining, I used a clean rag to apply Minwax pre-stain conditioner.

using prestain wood conditioner when refinishing a table

This helps prepare the wood so that the stain goes on more evenly. Wipe off any excess wood conditioner and allow it to dry for around 15 minutes.

staining a tabletop with a clean rag

Then use a clean rag to apply the stain.  Wipe it on in long, even strokes and be sure to keep a wet edge.

Wipe off any excess stain and allow the stain to fully dry following all instructions on the can of stain. If you want the color to be a bit deeper, you can apply a second coat of stain after 4-6 hours.

Allow the stain to fully dry before applying a sealer. Eight hours is the recommended minimum amount of time and will probably feel like far too long.  Just be patient.  We definitely don't want to screw things up at this point!

Sealing the Tabletop

When refinishing a table, it is very important to seal your finish well.  Tabletops take lots of abuse and nobody wants to have to refinish their table again after only a few months of use.

applying polyurethane when refinishing a dining table

I used Minwax Fast Drying Polyurethane to finish my tabletop, but to be honest, this is not my favorite product to work with. I find it very difficult to apply smoothly without brushmarks, even when using a foam brush to apply.

(Confused about top coats and which ones are best for refinished furniture?  I have to-the-point reviews of all of the best and worst furniture sealers right here.)

I applied three coats to this tabletop using a foam brush, sanding with 400 grit sandpaper between coats to help smooth out the brushmarks.

I much prefer General Finishes High Performance Top Coat. It is more forgiving and easier to apply and works well over both stain and paint.

The Refinished Table

Check out this beauty now!

refinished dining table with stained top, painted legs, and painted chairs

Now that is one beautiful table!

In some of the photos, it looks like one section of the table is a different color from the rest. In reality, everything is the same. Because of the angled wood grain, the various sections catch the light differently and may appear to be different colors.

refinished tabletop shown from above

beautiful refinished tabletop

Here are links to the other DIY projects you see in this room in case you missed them:

  • Dining Chair Transformation
  • How to Reupholster Furniture with Gorgeous Leather
  • DIY Ombre Curtains

Ready to see some more fabulous furniture flips from the rest of the Furniture Flippers?  These are the before pictures.  Just click the links to see how they turned out.

A must read if you refinish furniture. There are so many great futniture refinishing ideas in this post.

  1. How to Create Fabulous Painted Furniture with Cutting Edge Stencils by Just the Woods
  2. How to Refinish a Worn Out Dining Table by Lovely Etc.
  3. How to Fix a Chair with a Broken Seat by Refresh Living
  4. The Coffee Table Flip That Did Not Go As Planned by A Fresh-Squeezed Life
  5. Restoring an Antique Steamer Trunk by Repurpose and Upcycle
  6. The Best Way to Get Cheap Rustic Furniture by Thirty-Eighth Street

I'd love for you to share this post on Pinterest!

Materials

  • KleanStrip Stripper
  • KleanStrip Paint Stripper After Wash
  • Stripping pads
  • Clean rags
  • Gloves
  • Zinsser Bullseye Clear Shellac
  • General Finishes Snow White Milk Paint
  • Minwax prestain wood conditioner
  • Minwax Provincial stain
  • Minwax fast-drying polyurethane, satin

Tools

  • Chip brush
  • metal container
  • stripping brush
  • Plastic paint scraper
  • Sanding block and extra sandpaper, 220 and 400 grit
  • HomeRight Finish Max Sprayer
  • Large Homeright spray shelter
  • paintbrush
  • foam brush

Instructions

  1. Use KleanStrip Stripper to remove the old finish with a chip brush.
  2. Use a plastic paint scraper to scrape away the old finish.
  3. A wire brush is needed to scrape away the finish from the table edge.
  4. Apply the KleanStrip Paint Stripper After Wash to a small section. Scrub it into the wood in small circles.
  5. Use a second damp stripping pad to rinse away any remaining residue.
  6. Wipe away any remaining water and gunk with a clean rag.
  7. Once the table is fully dry, use sandpaper to remove any remaining stain.
  8. Remove the sawdust from the tabletop using a soft cloth.
  9. Clean the table legs to remove any greasy residue, crumbs, and dust.
  10. Use painter's tape and thick wrapping paper to cover the tabletop.
  11. Apply two coats of the shellac or an oil-based primer.
  12. Once dry, apply two coats of paint using either a paintbrush or the HomeRight Super Finish Max Paint Sprayer. Allow the paint to dry.
  13. Use a clean rag to apply Minwax pre-stain conditioner to the table top.
  14. Wipe off any excess conditioner and allow to dry for around 15 minutes.
  15. Apply the stain of your choice with a clean rag.
  16. Wipe off any excess stain and allow the stain to fully dry before applying a sealer.
  17. Apply three coats of polyurethane using a foam brush.
  18. Sand with 400 grit sandpaper between coats to smooth out the brush marks.

Google Web Story: How to Refinish a Dining Room Table

How Do I Refinish My Dining Room Table

Source: https://www.lovelyetc.com/refinish-dining-room-table/

Share:
banner